Shooting a slingshot is challenging. Unlike rifles or crossbows, the shooter has no sight that tells him where the projectile will go. Additionally, the relative low speed of slingshots results in curvy trajectory bow which changes the point of impact even on relatively close distances. Third, the important variables like power, power of the two rubber bands in respect to each other or slingshot movement during the shot depend very much on the shooter and his ability to reproduce the same procedure with every shot.

Put the pellet into the pouch. Make sure that it is centered. Now, hold the pouch with your thumb and your bent index finger. Try to keep the thumb straight. Then, pull the pouch back until it reaches your cheek. The point where your pouch touches the face is the "anchor point". Keeping a consistent anchor point with every shot is the basis for successful shooting.
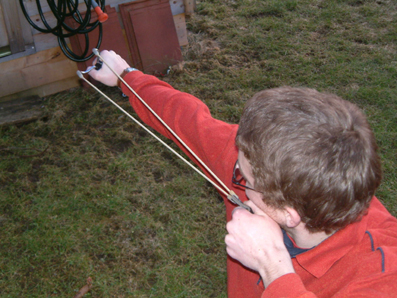
Hold the slingshot tight and comfortably. (Read the "How to hold" article for more information).
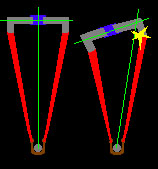
A common mistake is the misalignement ot prong and bands. This does often result in broken bands when the ends of the prongs are hit by the projectile. See the following picture for proper and unproper alignement.
Now that you've pulled the pouch to your cheek, you certainly want to release the pouch and see how the pellet flies straight in the middle of the target. I said in the beginning that the slingshot has no sight. This is not exactly true. I you keep a consistent stance, the slingshot fork will always be in the same position relative to the bands, and can be used to align the slingshot. Let us assume you hold the slingshot in the 90° way. Concentrate on one point of the slingshot - usually the upper fork end if you shoot 90°-style, remember how its position relative to the target and shoot. But don't concentrate on the slingshot, focus your eyes on the target and try to develop an instinctive feel.
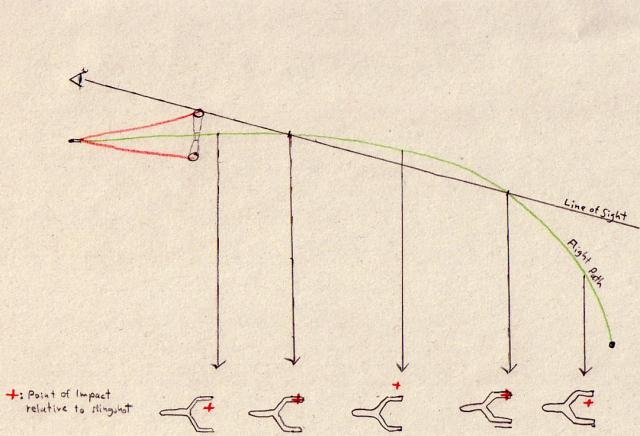
Now you know how to hit a target at a specific range. But what happens if the distance changes? Most people think you have to lower the slingshot for shorter ranges and have to raise it for longer ones, but this is not always true. Our line of sight is straight, while the slingshot projectile is affected by gravity during flight. The image beneath shows you that you have two distances where your sight point of the slingshot is, from the shooter's point of view, directly before the impact point. Between, the aiming point has to be lower and before and after, it must be above the target.
If you hold the slingshot at a perfect 90° cant and aim with the point where the rubber meets the fork, you'll realize that the shots fly a bit to the right (when you hold the slingshot with the right hand). the reason is that the hand that holds the slingshot must withstand the pull of the bands, and when the rubber is released, the muscles still have some tension and move the hand. There are two ways to remain accurate: First, you can keep the angle and aim always to the left. This way, aligning the slingshot remains easy, as it is not diffucult to hold something vertically. But you either choose still to aim with the tip of the fork, but left to the target - which is not good, because you want to concentrate on the target, and not on some imaginary point left of it - or you can search for another "aiming point" on the slingshot, which may, depending on the design, be easy or not. Your brain automatically knows where the fork ends or where the rubber meets the fork, but it has difficulties to aim with an imaginary spot somewhere on the fork, or above the it. At this point, you can make things much easier for you if you mark the aiming point with a pen or a piece of tape, or employ a more sophsiticated sight.
The second way to stay on target is canting - that means, you don't hold the slingshot vertically to the ground, but, for example, in a 45 degree cant. The lower the angle is, the more does the slingshot shoot to the other side (in relation to the upper fork end). You try until you find the angle that makes the bullet hit right on (or above, or below) the fork tip. This way, you don't need a sight and can aim with the fork tip. I recommend this method especially for classic slingshots without wristbrace and sight.
The disadvantage is that you may find it difficult to hold the slingshot in the same angle with each shot. The brain can easily judge if something is parallel or orthogonal to the ground, but has problems to find angles in between. Jack Koehler's great book Proposes two good methods: Either attach something to the slingshot that is horizontal or vertical to the ground when the slingshot is held correctly, or attach a level bubble to the fork that is levelled at the proper angle.
Whatever you choose to do, you will never be able to completely eliminate the problem. The amount of the effect depends very much on your body, that is, how fatiqued your muscles are and so on. And as your muscles fatigue over prolonged shooting, your point of impact will constantly change.You will never be able to "sight in" before a tournament, and can aim the same way all the time. This is a strong argument against slingshots with high pull weight, they will wear out your arm faster and you'll have more problems with this. On the other hand, a slingshot with high speed releases the projectile faster, and one has less time to move the hand.
A final word on stabilizers: They are made to counter the described effect. The hand will move less because the inertia of the slngshot is higher. But stabilizers only lessen the problem, they don't solve it completely.